
How to Install Byrd Shelix Cutterhead on DW735 Planer?
If your DeWalt DW735 keeps tearing out figured wood or screaming so loud you cannot work past 8 PM, you have hit the ceiling of what stock straight blades can do. The Byrd Shelix cutterhead solves both problems and turns your budget planer into something that rivals machines costing three times as much.
This guide walks you through the entire installation, from tools you need to torque specs that matter, so you can complete the upgrade in about an hour without breaking anything expensive.
Quick Installation Overview
Here is what to expect before you start
Time Required
45 to 60 minutes
25 to 30 minutes with experience
Skill Level
Intermediate DIY
If you can change brake pads, you can do this
Tools Needed
Basic Shop Tools
Hex keys, torque wrench, mallet, safety gear
Total Cost
$475 to $525
Complete cutterhead kit
Compatibility
DW735 and DW735X
DeWalt models only
Warranty Impact
Voids DeWalt Warranty
Byrd offers their own warranty
Break Even Point
18 to 24 months through reduced blade costs
The Bottom Line
The upgrade transforms your DW735 into a professional grade tool. You get smoother cuts on figured wood, noticeably quieter operation, and blade edges that last 10 times longer than stock.
Why You Should Upgrade to the BYRD SHELIX CUTTERHEAD?
The stock DW735 works fine for straight-grained lumber. Push it into curly maple, quilted walnut, or reclaimed oak with knots and you will see the limits fast. The Shelix cutterhead solves the problems most DW735 owners eventually face.
Cleaner Cuts on Difficult Wood
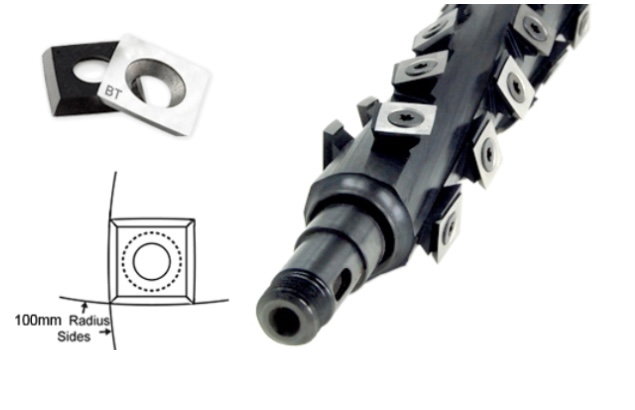
The Byrd Shelix uses 40 to 60 individual carbide inserts arranged in a spiral pattern. Instead of three straight blades chopping the wood, each insert takes a small angled shearing cut. The result is dramatically less tear-out on figured grain, cleaner surfaces on end grain, and finished boards that need 30 to 50 percent less sanding.
Significantly Quieter Operation
Straight blades produce 90 to 95 decibels of aggressive chopping noise. The Shelix drops that to 82 to 85 decibels of smooth whirring. To your ears, this sounds like less than half the volume. You still need hearing protection, but the noise becomes tolerable enough for evening work sessions.
Longer Blade Life
Stock DW735 blades need sharpening or replacement every 20 to 40 hours of use. Each Shelix insert has four rotatable edges, and each edge lasts 200 plus hours. That means 800 hours of cutting per insert before you need a new one. Heavy hobbyists typically rotate inserts once every two to three years.
Lower Long Term Cost
Stock blades cost $25 to $40 per set and you replace them 4 to 6 times per year with regular use. That is $120 to $240 annually. Shelix inserts cost $8 to $15 each, but you only replace damaged ones, not the whole set. Most users spend under $30 per year on insert maintenance.
BYRD SHELIX VS STOCK DW735 CUTTERHEAD
Here is the head to head comparison across everything that matters.
- Blade Type: Stock uses three straight steel knives. Shelix uses 40 to 60 individual carbide inserts.
- Cut Quality: Stock produces good results on straight grain but tears out on figured wood. Shelix produces excellent results on all wood types.
- Noise Level: Stock runs at 90 to 95 decibels. Shelix runs at 82 to 85 decibels.
- Blade Life: Stock lasts 20 to 40 hours before service. Shelix lasts 200 plus hours per edge with four edges per insert.
- Replacement Cost: Stock costs $25 to $40 per set. Shelix costs $8 to $15 per individual insert.
- Maintenance Style: Stock requires replacing or sharpening the entire blade set. Shelix lets you rotate individual inserts as needed.
- Initial Cost: Stock comes with the planer. Shelix costs $475 to $525 aftermarket.
Best For: Stock handles basic dimensional lumber and straight-grained wood. Shelix excels at fine woodworking, figured wood, and quiet operation.
Is the BYRD SHELIX Worth the Cost?
The $500 price tag makes most woodworkers pause. Here is why it makes financial sense for serious users.
Upfront Investment Breakdown
You pay $475 to $525 for the complete cutterhead kit. Buy directly from Byrd Tool Corporation for the best warranty and manufacturer support. Amazon and Woodcraft also sell authorized kits with the same warranty coverage.
Where the Savings Come From
Stock DW735 blades cost about $30 per set and last around 30 hours. Heavy users replace them 4 to 6 times yearly, spending $120 to $180 annually. Shelix inserts last 800 hours per position, so most users spend under $30 per year on replacements.
Over a five year period, expect to spend roughly $600 to $900 on stock blade maintenance. The Shelix costs $500 upfront and maybe $150 in insert replacements over that same period. You save $50 to $250 in direct blade costs alone.
Hidden Value Beyond Blade Costs
The real value shows up in project quality. Fewer ruined boards from tear-out saves you money on expensive hardwood. Less sanding time means faster project completion. Quieter operation lets you work longer without hearing fatigue and allows evening sessions without disturbing family or neighbors.
When It Pays Off Fastest
You break even fastest if you fit these categories. Small commercial shops recover the cost in 8 to 12 months. Serious hobbyists processing 20 plus board feet weekly break even in 18 to 24 months. Occasional users may take 3 to 4 years to recover the investment through blade savings alone.
This article contains affiliate links. If you buy through these links, we earn a small commission at no extra cost to you. This helps support our free tools and honest reviews.
Where to Buy: Recommended Products
If you are ready to upgrade your DW735 with the Byrd Shelix cutterhead, here are the products you need. We use Amazon for pricing transparency and reliable shipping, though you can also buy directly from Byrd Tool Corporation.
1. Byrd Shelix Cutterhead for DeWalt DW735

This is exactly what you need for the installation covered in this guide. The Shelix cutterhead comes complete with 40 individual carbide inserts arranged in a spiral pattern, matched precisely to fit the DW735 and DW735X models. The kit includes bearings, mounting hardware, and detailed installation instructions.
Why we recommend it?
The Byrd Shelix delivers noticeably smoother cuts on figured wood, reduces planer noise by roughly 10 decibels, and each carbide insert lasts 10 times longer than stock straight blades. The spiral shearing action virtually eliminates tear-out on curly maple, quilted walnut, and other tricky grain patterns.
Best for: Any DW735 owner who works with hardwoods, wants quieter operation, or plans to keep their planer for years.
Price range: $475 to $525
2. DeWalt DW735X Two-Speed Thickness Planer
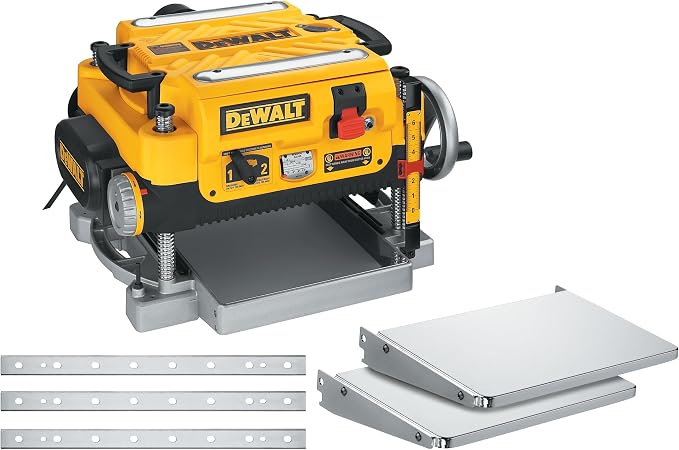
Do not have a DW735 yet? Start with the DW735X package version. It comes with extension tables and an extra set of blades, making it ready to work right out of the box. This is the perfect base planer for the Shelix upgrade later.
Why we recommend it?
The DW735 has been the benchmark benchtop planer for over a decade. It features a three-knife cutterhead, two feed speeds for roughing and finishing cuts, and produces professional quality results. The X package saves you money by including accessories you would buy separately.
Best for: Woodworkers who need a reliable 13-inch benchtop planer with room to upgrade later.
Price range: $649 to $749
Complete Tools and Material List
Gather everything before starting. Nothing kills momentum like discovering you need a tool halfway through disassembly.
Required Tools
You need a Byrd Shelix cutterhead kit specifically designed for the DW735 (accept no substitutes). A metric hex key set covering 2mm through 8mm handles all the bolts. A torque wrench with inch-pound settings ensures proper tightening. A rubber mallet or soft-faced hammer helps seat components without damage. Keep a small flathead screwdriver handy for adjustments. A bearing puller may come with your kit or you can rent one from your local auto parts store. Clean work rags remove old grease and dust. Machine oil or lithium grease lubricates the new bearings.
Safety Gear (Non-Negotiable)
Never skip safety equipment. Safety glasses or goggles protect against flying debris. Work gloves (leather preferred) protect your hands during handling. A dust mask keeps you from breathing accumulated planer dust. A long sleeve shirt prevents scratches from sharp edges.
Optional Helpful Items
A magnetic parts tray prevents losing small bolts (learned this the hard way). Your phone or camera documents each disassembly step for easy reassembly reference. Good lighting matters more than you think, especially for identifying dust-covered bolt sizes. Having an assistant makes lifting the cutterhead safer. Print the torque specification chart from Byrd Tool for quick reference.
Pro Tip
Take clear photos before you touch anything. Photograph the cutterhead assembly from multiple angles. When reassembling, these photos become your best friend if you get confused about parts placement.
STEP BY STEP INSTALLATION PROCESS
Take your time and follow each step carefully. Rushing causes mistakes that damage expensive components.
Step 1: Prepare Your Workspace
Unplug the DW735 completely. Not just off, unplugged from the wall. Move the planer to a clean workbench with good lighting. Remove the dust hood and any accessories that might get in the way. Wipe down the exterior to prevent debris from falling into the mechanism during disassembly.
Step 2: Remove the Chip Deflector and Top Cover
Locate the four screws holding the chip deflector. Remove them and set the deflector aside. Next, remove the eight screws securing the top cover. Two of these screws are hidden under rubber caps at the front. Pop the caps off with a small flathead screwdriver. Lift the top cover off carefully, watching for any wires that may need disconnection.
Step 3: Remove the Existing Cutterhead
Locate the two bolts securing each end of the cutterhead. Loosen but do not fully remove them yet. Support the cutterhead with one hand while removing the bolts completely. The stock cutterhead is heavier than it looks (about 3.5 pounds), so use both hands to lift it out of the housing.
Step 4: Remove the Pulley from the Old Cutterhead
The drive pulley must transfer to your new Shelix cutterhead. Use a pulley puller or two hex keys to remove the retaining bolt. Slide the pulley off carefully. Set the pulley aside on your parts tray.
Step 5: Install the Pulley on the Shelix Cutterhead
Slide the pulley onto the shaft of your new Shelix cutterhead. Ensure it seats fully against the shoulder. Install and torque the retaining bolt to Byrd’s specification (usually 25 to 30 inch pounds). Confirm the pulley spins freely without wobble.
Step 6: Install the Shelix Cutterhead in the Planer
Carefully lower the new cutterhead into the housing. Align the bearing housings with the mounting holes. The cutterhead only fits one way, so if it feels wrong, flip it around. Once aligned, install the four bearing housing bolts by hand first to prevent cross-threading.
Step 7: Torque All Bolts to Specification
Using your torque wrench, tighten the bearing housing bolts in a crisscross pattern. This ensures even seating. Torque to the exact specification in your Byrd manual (typically 55 to 65 inch pounds). Never guess or over-tighten these bolts.
Step 8: Reinstall the Top Cover and Chip Deflector
Lower the top cover carefully, reconnecting any wires you disconnected. Install all eight screws by hand first. Torque them in a crisscross pattern to prevent warping. Replace the rubber caps over the hidden screws. Reattach the chip deflector using the four original screws.
Step 9: Perform Initial Test Run
Plug the planer in and turn it on for a few seconds without wood. Listen carefully. Any unusual noise, vibration, or grinding means you need to stop immediately and troubleshoot. A properly installed Shelix runs smoothly with a distinctive whirring sound.
Step 10: Make Your First Test Cut
Feed a sacrificial board through the planer. Take a very light cut (about 1/64 inch). Inspect the surface carefully. It should be noticeably smoother than your stock cutterhead produced. If you see chatter marks or uneven cutting, check for loose inserts or misalignment.
Related Read: Are Planer Blades Universal? Find the Right Fit for Your Model
WHAT TO EXPECT AFTER INSTALLATION
The first few passes will surprise you if you have used the stock cutterhead for a while.
Immediate Cut Quality Changes
Surfaces come out visibly smoother right from the first pass. Tear-out on figured wood drops dramatically or disappears entirely on straight-grained material. Sanding time decreases by 30 to 50 percent on most projects. End grain planing becomes possible without destroying your workpiece.
Sound Changes You Will Notice
The planer runs about 10 decibels quieter, which sounds like less than half the noise to your ears. The aggressive chopping of straight blades becomes a smoother whirring. You still need hearing protection, but the sound becomes less fatiguing during long sessions.
Feed Rate Adjustments
You can feed boards slightly faster through the planer because the spiral inserts cut more efficiently. Do not overdo this though. Light cuts (1/32 inch or less) still produce the best results with any planer setup.
The Break In Period
The cutterhead performs at its best after the first 5 to 10 hours of use. Some woodworkers notice slight improvement in cut quality as the inserts settle into their positions. This is normal and expected.
What Will Not Change
Realistic expectations prevent disappointment. The motor sounds the same, feed rollers work as before, and snipe still occurs (though slightly less due to smoother cutting). The Shelix will not fix mechanical issues with your DW735 like worn feed rollers or table alignment problems.
Troubleshooting Common Installation Problems
Even careful installations sometimes hit snags. Here are solutions to the problems most people encounter.
1. Cutterhead Wobbles After Installation
The bearings may not be seated correctly. Remove the cutterhead and inspect both bearings for damage. Reinstall using a bearing press or careful hammer taps on the inner race only. Never strike the outer race directly because this damages the bearing immediately.
2. Motor Struggles to Reach Full Speed
Check that the drive belt is properly aligned. The Byrd Shelix is heavier than the stock cutterhead, so the belt may need slight tension adjustment. Refer to your DW735 manual for belt tension specifications. Also verify the belt itself has not stretched or worn.
3. Excessive Vibration During Operation
Uneven insert placement causes vibration. Check that all inserts sit flush against the cutterhead body. Retighten each insert screw to the manufacturer torque spec (usually 55 inch-pounds). Any loose or missing insert creates immediate vibration.
4. Cuts Look Better on One Side of the Board
The cutterhead is not parallel to the planer bed. Loosen the bearing housings and check with a dial indicator. Both ends of the cutterhead should measure the same distance from the bed within 0.002 inches. Adjust the bearing housings until parallel.
5. New Snipe After Installation
The cutterhead lock is not engaging properly. The Byrd Shelix has slightly different lock engagement than stock. Adjust the cutterhead lock cam per the Byrd installation manual until it engages firmly with each pass.
5. Belt Slips or Squeals
The heavier cutterhead needs proper belt tension. Apply a small amount of belt dressing if the belt is old. Consider replacing the drive belt if it has more than 200 hours of use. New belts cost about $15 and take 10 minutes to install.
7. Loud Noise or Grinding Sound
Stop immediately. This usually indicates bearing failure or debris caught in the cutterhead. Remove the cutterhead cover and inspect carefully. Never run the planer with unusual noises because you risk damaging expensive components.
If you’re new to surface planing or want to master setting up your machine, check out our ultimate wood planer guide for expert tips and techniques.
Post Installation Maintenance
Proper care keeps your Shelix cutting like new for decades.
Regular Insert Rotation
Each carbide insert has four cutting edges. When one edge dulls, loosen the insert screw, rotate the insert 90 degrees, and retighten. This takes about 15 seconds per insert. You get four insert lifespans before needing replacement. Most home users rotate inserts once every two to three years.
Cleaning the Cutterhead
Wipe the cutterhead clean after each use with a soft brush or compressed air. Sawdust buildup between inserts affects cutting quality over time. Never use water or solvents because they can damage the bearings.
Monthly Inspections
Check each insert monthly for cracks or damage. Damaged inserts create chatter marks and can loosen during operation. Replace damaged inserts immediately (about $10 each). Also verify all insert screws remain properly torqued.
Annual Deep Cleaning
Once a year, remove the top cover and thoroughly clean around the cutterhead. Inspect the bearings for smooth rotation without noise. Check the drive belt for wear. This annual maintenance takes 20 minutes and prevents expensive problems.
Related Read: DEWALT 20V MAX Planer Review: Is It the Best Cordless Hand Planer?
FINAL THOUGHTS
The Byrd Shelix cutterhead upgrade delivers everything it promises. Smoother cuts on difficult wood, dramatically quieter operation, and blade edges that last 10 times longer than stock. The $500 investment pays back within 18 to 24 months through reduced blade costs alone, and the improvement in project quality shows up from the first pass.
Take your time with the installation. Gather all tools before starting, use proper torque specifications, and take photos as you disassemble. Most DIY woodworkers complete this upgrade successfully on their first attempt with basic mechanical skills.
Ready to eliminate snipe on your upgraded DW735 too? Try our free planer snipe calculator to get exact measurements for every project. Combined with your new Shelix cutterhead, you will produce professional quality boards every time.
For more troubleshooting help with your DW735, check our guide on what to do when your DeWalt planer will not turn on. And if you want to see if the newer DeWalt 20V MAX planer might be a better fit for your workshop, we have a full review comparing both models.
FAQ’s
Q: Does installing the Byrd Shelix void my DeWalt warranty?
A: Yes, aftermarket cutterhead installations void the original DeWalt warranty. However, Byrd Tool Corporation offers their own warranty on the cutterhead. Most owners consider the trade-off worthwhile.
Q: Can I install the Byrd Shelix on the DeWalt DW734?
A: No, the DW734 and DW735 use different cutterhead sizes and mounting systems. Byrd makes a separate cutterhead specifically for the DW734.
Q: How long does the actual installation take?
A: First-time installations typically take 45 to 60 minutes. Experienced users complete the swap in 25 to 30 minutes. Do not rush the process.
Q: Do I need professional help to install this?
A: No, most DIY woodworkers with basic mechanical skills can complete this installation. If you can change car brake pads, you can install the Byrd Shelix.
Q: Will the Byrd Shelix eliminate snipe on my DW735?
A: The Byrd Shelix reduces snipe slightly but does not eliminate it. Use extended tables and sacrificial boards for best results. Try our free planer snipe calculator to determine exact snipe amounts for your setup.